Cheerlights is a project that synchronises the colours of internet-connected devices around the world. Anyone can choose the current colour simply by sending a Tweet that includes the word ‘cheerlights’ and the name of a colour (one of red, green, blue, cyan, white, oldlace / warmwhite, purple, magenta, yellow, orange, pink, or black).
The current colour is :
The Cheerlights website has all the information about how to get involved, with lots of examples of projects to inspire you.
So here’s another one. Nothing radically original: the hardware is adapted from various sources, although the software is largely my own. When no new colours come through for a while, it displays a randomly changing hue.
It’s currently installed in our kitchen, as mentioned in a recent Tweet.
Hardware
The heart of the gadget is the ESP8266 chip, which can run quite sophisticated code and has built-in WiFi connectivity.
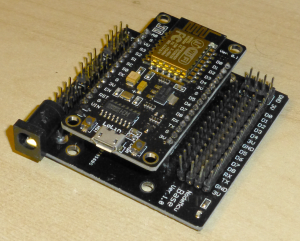
For convenience, I used the ESP8266 packaged as a NodeMCU Devkit ESP8266-12E, and plugged that into a Lolin NodeMCU Base Shield. The base allows me to plug in a single 12V supply that provides power for both the NodeMCU board and the LED strip.
LED strip
I used a cheap strip of RGB LEDs [… need the specs — current drawn etc.] — not the clever WS2811 / ‘Neopixel’ ones. The only issue with them is that the colours aren’t balanced: for example, mixing maximum red and maximum green (to get yellow) gives a nasty shade of yellow-green. I had to add some factors in the code to allow for this.
Interface board
The home-made bit of the hardware converts the PWM (see below) signals to the voltages required by the LED strip.
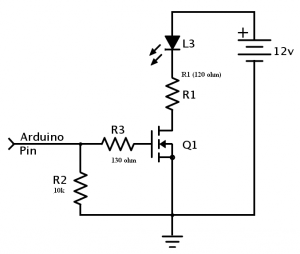 The circuit I ended up with is derived from https://forum.arduino.cc/index.php?topic=114705.
Please note that I don’t really know what I’m doing with electronics: if you make use of this design, you must do your own checks and testing to make sure that the circuit doesn’t draw too much current or overheat.
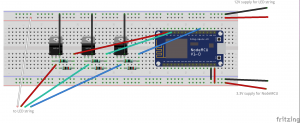
It uses three IRL520N MOSFETs, one to control the 12V supply to each colour, as driven by the signals from the ESP8266.
The circuit layout, as a breadboard design created in Fritzing is shown. The .FZZ file can also be downloaded.
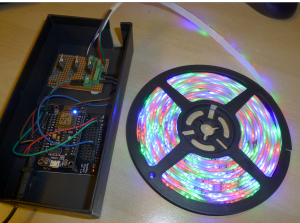
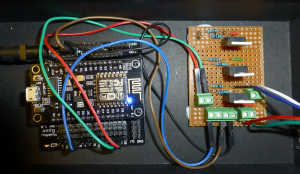
NodeMCU, interface board, and LED strip. (This shows a strip with separate red, green, and blue LEDs; I later used a better strip with proper three-colour LEDs)
I transferred the MOSFETs and resistors to stripboard to make it more permanent.
The circuits are mounted in a cardboard box, and held in place with Blu-Tack (other brands of sticky stuff are available).
Software
The hardware runs the NodeMCU firmware, which is thoroughly documented, and provides a Lua interpreter/compiler and filesystem.
The NodeMCU was supplied with version 0.9.6 of the NodeMCU firmware, which was fine until I need to use the ‘http’ module. For that, I downloaded a custom-built version of the latest firmware from the excellent service at nodemcu-build.com. My build included just the Lua modules that I needed, freeing up valuable space on the hardware. The firmware identifies itself as
NodeMCU custom build by frightanic.com
 branch: master
 commit: 81ec3665cb5fe68eb8596612485cc206b65659c9
 SSL: false
 modules: file,gpio,http,mqtt,net,node,pwm,tmr,uart,wifi
 build built on: 2016-12-09 18:27
 powered by Lua 5.1.4 on SDK 1.5.4.1(39cb9a32)
I found that I needed to erase the firmware before trying to upload a new one. I used esptool.py and these commands (adjusting the serial port and firmware filename to suit):
esptool.py --port /dev/ttyUSB0 erase_flash
esptool.py --port /dev/ttyUSB0 write_flash -fm dio 0x00000 "nodemcu-master-10-modules-2016-12-09-18-27-52-integer.bin" --verify
The board has a micro-B USB socket which can be connected directly to your computer, and provides power as well as the connection for flashing firmware and uploading your own Lua code.
The software that gets the colours from Cheerlights and sends them to the LEDs is on Github.
I used the ESPlorer IDE to upload and run the Lua code.
You will need to rename the file wifi-ssids.example.lua to wifi-ssids.lua, and then edit it to include your own SSID(s) and password(s).
Once you’ve got it all running, you can rename test.lua to init.lua so that the code will run automatically when the circuit is powered up.
It’s a bit quirky. At one stage I seemed to be getting an unreliable feed via MQTT, so I added code to use the HTTP API instead. Now it uses both feeds, just to be sure. As a result, it would be very easy to add another ‘colour source’, such as a temperature sensor, to control the colours.
Features / Bugs
- To keep the light level fairly constant, each colour is scaled so that R+G+B is the same. This means that the difference between purple, and magenta is lost.
Installation
‘Installation’ is probably too strong a word. I just stuck the LED strip along the shelf above the kitchen cupboards, tucked the hardware in amongst the crockery, and plugged the power supply into the socket that usually powers the extractor fan.
Here’s the final result — making our new kitchen look very cheery.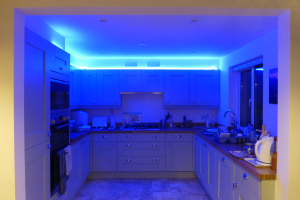
Issues
- The software PWM sometimes seems to cause flickering. Using dedicated chips for the PWM might help.
